How to Send Files Using safedrop
Sending secure files with safedrop is quick and compliant. Here’s how it works, from login to delivery.
Watch the video
🟠 Step 1: Log In and Start a safedrop
After logging in, you’ll land on the safedrop compose page.
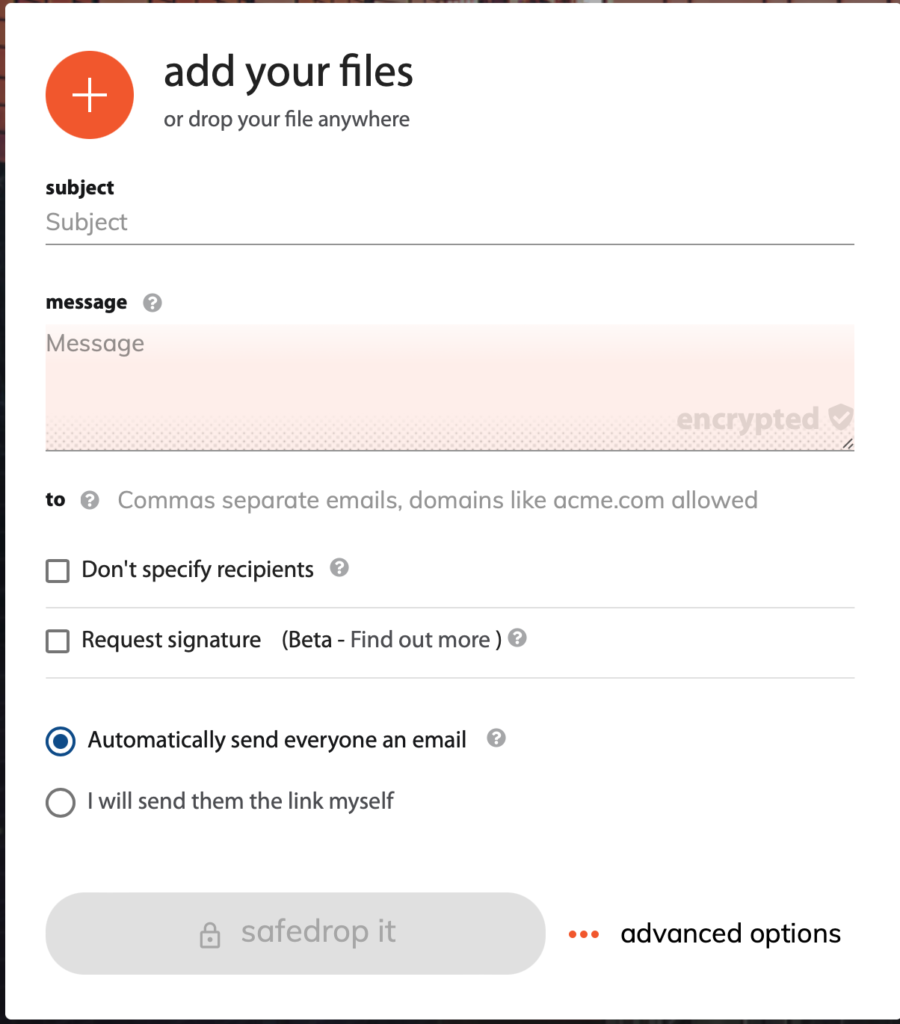
📎 Step 2: Add Your Files
You have two options:
- Drag and drop files into the drop zone, or
- Click the orange “+” icon to browse and select files from your device.
✍️ Step 3: Add a Subject and Message (Optional)
- Add a subject line and a message for your recipient.
- If you want more privacy, you can encrypt the message, so it's only visible once the recipient is verified and has accessed the safedrop.
|| Note: These fields are optional — you can still send files without them.
👥 Step 4: Add Recipients
Enter one or more email addresses. Separate multiple addresses with commas or add them one by one, hitting Enter after each.
You can also choose "Don’t specify recipients" — this creates a link you can share manually.
📤 Step 5: Choose How the safedrop Will Be Sent
You have two choices:
Option 1 – Automatically send everyone an email
safedrop will email recipients a secure link.
Option 2 – I will send them the link myself
safedrop gives you a link to copy and paste into your own message.
Best for bypassing spam filters — especially with clients or legal teams.
🚀 Step 6: Click “safedrop it”
Once you’ve added files or typed a message, the “safedrop it” button will activate (it turns orange).
- If you chose manual sending or no recipients, you’ll see a summary page with your safedrop details and link. Copy and share it however you like — email, WhatsApp, Teams, etc.
- If you chose automatic email, you’ll be taken to a confirmation page that shows the settings: expiry time, allowed downloads/views, and more.
Your settings will be remembered the next time you log in.
⚙️ Advanced Sending Options
These optional settings help you control access and visibility:
🔑 Password
Add a password for extra protection.
🏷️ Reference
Use this as an internal tag or ID for audits.
⏰ Delete After
Set an expiry: from 1 hour to never. Great for time-sensitive documents.
⬇️ Allowed Downloads
Limit how many times a recipient can download or view the files.
Set to 1 for a one-time, “self-destruct” style safedrop.
🔍 View Security
- Full access – Allows file downloads.
- View on screen only – Restricts to browser-based previewing (no downloads).
🧾 Verify Recipients
Choose how safedrop checks recipient identity:
- Off – Anyone with the link can view.
- Enter email – Recipient must type in their email before access.
- Magic link – Recipient gets a secure access email. They must click the link or enter a code.
🔐 Encrypt Message
Tick this to hide your message from emails — it only shows after the safedrop is accessed.
🔁 Allow Replies (only with Magic Link)
Lets recipients reply and upload files back into the safedrop.
Everyone on the safedrop can view these reply files.
🛠️ Troubleshooting or Questions?
We’re here to help.
Email support@safedrop.com and we’ll sort it.
Updated on: 16/05/2025
Thank you!